Images are an important part of any website. They can convey information, set an emotional tone for your content, humanize the people of Rush and make connections, and provide visual interest to keep visitors engaged.
Images require special handling to be effective on a website. Please learn about best practices for making the most of your images below.
Where to find images
- Rush image library: https://medialibrary.rush.edu/
- You'll need to request an account to access this catalog of images taken by Rush photographers
- Faculty headshots: https://medialibrary.rush.edu/headshots
- Getty Images
- Unsplash
- Flickr images licensed for commercial use
Copyright considerations
- Important note: Do not simply search for images online and download them to use on your pages. It's important to respect copyright and only use images that are licensed to Rush or free for public use.
Cropping, resizing and compressing
Before any image can be placed on your web page, it must be adjusted to a proper size.
Image sizing is important for limiting file size, and ensuring that the image fits the area where it's needed. Many cameras, including smartphones, take images at very large sizes with dimensions in the thousands of pixels. The vast majority of images on the website only need to be a maximum of 600 pixels wide or tall, making the raw files much too large.
Image sizing & aspect ratios
The correct image size and shape depend on where it is being used. Each component has specific image sizing needs. Make sure to review the specifications below:
- Faculty Profile: 343 x 259
- Featured Facts: 600 x 400
- Featured Media - 1 column: 600 x 338
- Can also accommodate portrait images with the limit-height option selected.
- Featured Media - 2 columns: 280 x 187
- Hero: 1440 x 440
- Media Cards: 584 x 328
- Media Cards Grid: 287 x 161
- News Article: 771 x 374
For WYSIWYG components, you have the flexibility to use a different size or shape. However, it's still important to resize so you're not uploading a huge image that dominates your page, and takes too much time to load. We recommend an image in a WYSIWYG be no larger than 600 pixels in its largest dimension. 4:3 or 3:2 (or their portrait orientation counterparts) are common proportions – so your image might be 600 x 450 when you've finished cropping and resizing it.
Helpful tip: If you’re adding images to a page which already has several similar images - for example, a table containing photos of all the residents in a residency program - start by looking at the size of the images on the page, and resize the photos you’re adding to those same dimensions.
Tools for resizing images
You are welcome to use any image editing software you prefer. If you are not familiar with any tools, we recommend Pixlr as an easy online tool which will allow you to save up to 3 images per day for free.
Pixlr Free Online Photo Editor
Image compression
Adding photos to the website with large file sizes can significantly slow down a page’s load speed, especially on mobile devices. This is important because 53% of mobile users leave a page if it takes longer than three seconds to load. Additionally, Google has started using page load speed as a factor in ranking pages within its search results.
If you submit a page edit that includes a photo with an unnecessarily large file size, you’ll be asked to resize and/or compress it. Compressing the image can reduce its file size with no degradation in quality and is recommended to make your page load as fast as possible.
Free image compression with Squoosh
Naming your image files
Using a consistent and descriptive filename can make your images easier to find in the media library. If you upload your files to the website with names like "Thumbnail 1.jpg" or "IMG00306887.png", it will be difficult to search and find them again to place on your page.
We recommend including the following elements in your file name separated by hyphens:
- keywords describing the image, including any group or event it is associated with (e.g. neurology-residency-boat-tour)
- If these change yearly, add the year associated with them as well, so lowercase-name-with-hyphens-2016.
- image dimensions, width x height (e.g. 800x600)
For example: neurology-residency-boat-tour-2024-800x600.jpg
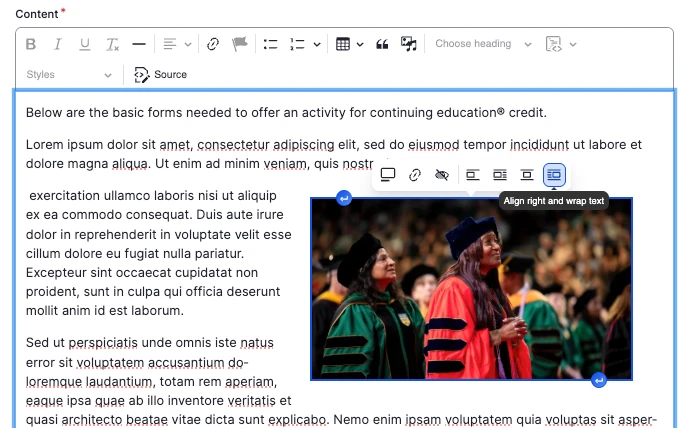
Placing images on the page
If you're using an image-based component, like Featured Media - 1 column, you'll automatically be prompted to upload your image to the Media Library.
If you're placing your image in a WYSIWYG or Accordion, it’s essential that you use the Media Library to upload the image. Do not copy an image to your clipboard and then paste it into your web page at any time.
Pasting images imports large amounts of unwanted formatting code that’s difficult to remove, and can significantly slow the page load speed – both for you and for your users.
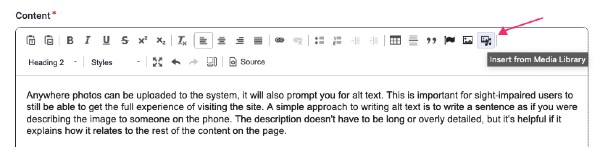
Alt text
Anywhere photos can be uploaded to the system, it will prompt you for alt text. This is important for sight-impaired users to get the full experience of visiting the site. A simple approach to writing alt text is to write a sentence as if you were describing the image to someone on the phone. The description doesn't have to be long or overly detailed, but it's helpful if it explains how it relates to the rest of the content on the page.
A secondary reason that alt text is important, is that search engine crawlers use this to identify images as well. Well-written alt text with keywords that relate to your webpage can help make your page more findable on search engines.
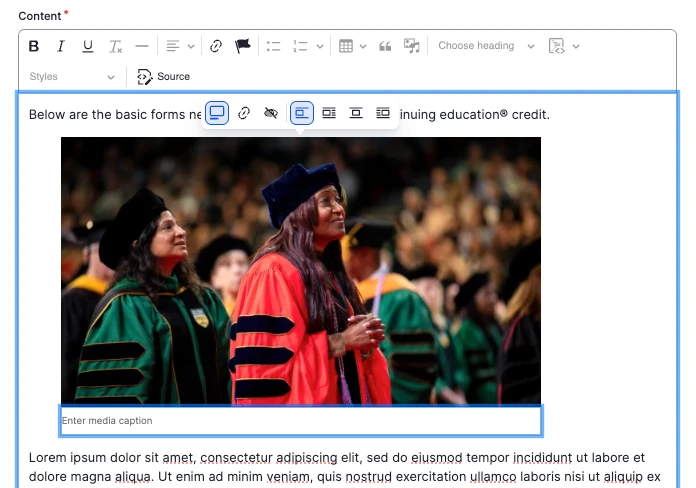
Captions

New in fall 2025! When adding an image to your web page, you now have the option to add a caption describing your image.
This feature is available in a WYSIWYG component.
Read below to learn how to add captions, and what to consider before deciding to add them.
Best practice: Do not include images where important information is written as text in the image itself. Why?
- Every laptop, desktop and phone will display your page at slightly different shapes and sizes. This can distort your image, making the text blurry or cutting off the edges entirely
- Non-sighted users will not have access to the same information as sighted users
If images containing text are used at all, the alt text must contain all of the text written in the image.
Images containing text may not be used in the Hero component at all and will be removed.

Rush's Creative Media Group takes official headshots of our faculty members.
If a faculty member chooses to use a different, non-official headshot, this is permitted on many pages of the website – for example, a "Meet Our Faculty" page for a GME program. However, it is not permitted in their official faculty profile. Only recent, official Rush headshots may be used in faculty profiles.