Overview
This versatile page style is used for the majority of pages on our website. A wide variety of components can be placed on this page type, making it highly flexible for use in many different situations.
Example pages
These pages are all built using the Basic Page style, to illustrate the variety of options available with this template.
Available components
- See examples of all components that can be placed on a Basic Page
- Tip: If you're not sure what component to place on your page, the WYSIWYG component is a good basic option that can be used for text, images, and much of what you want to include on your page
-
Creating new pages
- In your top black Drupal toolbar, click Content to access the Content Overview, then click the "+ Add content" button in the upper-right. Or, click Manage, then use your mouse to hover and select Content > Add content > Basic page.
- In the Title field, enter your page's title. All major words and prepositions of four letters or more should be capitalized.
- Select the department, office or program that owns this page in the Section dropdown.
- Add a description of your page in the Page Summary field. This required field provides critical information to users searching Google or other search engines. Enter 1-3 sentences describing what information is provided by the page, to help people understand what they'll learn if they visit the page.
- In the lower left, below the section header for "Body Content," you'll see a dropdown menu enabling you to add components to your page. Components are the "building blocks" of your page, which start out as empty placeholders for you to populate with information. Select and add the components that showcase your content best.
- Tip: The Working with Web Content page provides best practices and answers to a number of frequently asked questions.
- As you work on your new page, you may want to click Save periodically to save your work to date. You can make changes and save as many times as you need while you finalize your page. Your draft will not be reviewed or published until you’re ready.
Tip: If you have a manager or other stakeholder who wants to review your new page before you publish, you can share a sneak peek! Select the Preview Link tab, then copy the link you see on screen. This private link can be shared with stakeholders inside or outside of Rush to preview content before it's published.
Image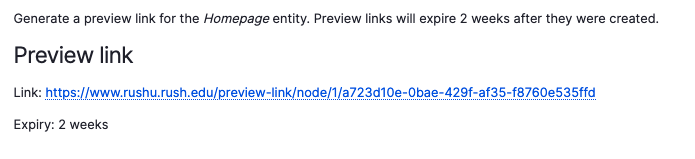
- When your page draft is complete and ready to publish, you'll submit it for review and publication. Set the Moderation State dropdown to Needs Review, then Save.
- Tip: For more information on the publishing process, see the Editorial Workflow page.
-
Editing an existing page
You'll be able to edit any pages which you are assigned to based on their section. Search the content overview to find the page you need to edit. Alternately, if you are logged in, you can navigate to the page or use a bookmark and you should see the View, Edit, and Revisions tabs if you have access to that page.
Once you're editing the page, you can expand each component by clicking the Edit button to its right.
To add a new component to an existing page, use the dropdown menu at the lower left below the Body Content section to add components to your page, which you can then populate with content. Select and add the relevant components. The Working with Web Content resources provide best practices and answers to a number of frequently asked questions.
Check the Page Summary
Each page requires a page summary describing its purpose. This summary is important for users arriving from Google and other search engines. For some pages a default page summary was provided that simply used a snippet of the first lines of text on the page.
Please take the time to rewrite any summaries that aren't an accurate, relevant description of the page content. Enter 1-3 sentences describing what information is provided by the page. For more information review this video on Search Engine Optimization.
-
Copying and duplicating content
Copying WYSIWYG content
Drupal unfortunately doesn’t have a copy feature to clone existing pages. This is a workaround if you want to copy WYSIWYG sections with complex layouts where a simple copy and paste from the webpage to the editor doesn't work correctly.
- Open two tabs in Drupal:
- In one tab, click Edit on the page with the WYSIWYG component you’d like to copy.
- In the other, in your admin menu select Content > Add Content > Basic page.
- On the new page, select your Section, add your Title, add your Page Summary, use the Menu settings to provide a menu link, and define your Parent page.
- In the old page, expand the WYSIWYG component and click the Source button on the right side of the editor.
- Select all the code in the editor (Ctrl + A) and copy it (Ctrl + C).
- On the new page, create a new WYSIWYG component and click the Source button on the right side of the editor.
- Paste the code from your clipboard into the editor (Ctrl + V).
- Click the Source button again to return to the WYSIWYG version of the editor
- You can now go back in and Edit to adjust copy, pictures and other elements to customize your new page.
This approach also works for accordions and other components that utilize HTML/text editor fields.
Duplicating components
Although components can't be copied from one page to another, it is possible to duplicate components instead of adding them from scratch. On the existing component, click the three vertical dots in the top right (just to the right of the Collapse button). This gives the option to Remove or Duplicate the component.
- Open two tabs in Drupal:
-
Adding anchor links
Creating Anchor links
For longer pages of text — especially those with discreet subheads — you may wish to create anchor, or “jump,” links in a list at the top of the page to help users navigate quicker to where they’d like to go. Here’s how to create them.
- Each component has an optional Anchor tag field at the top. Add a label to this field; for best results only use text and hyphens.
- Any component that can hold links can be used, but bulleted lists in WYSIWYG components are most common for this purpose. Insert a bulleted list and create bullet points that echo the names of the subheadings on your page. For clarity, it’s recommended you use the exact same copy in these links as is in the subheads further down the page.
- Highlight each individual bullet’s text, click the Link (chain) button in your editing toolbar and type in your label preceded by a number/pound sign (e.g. #anchor-link).
- Save the link.
Note: It is also possible to link to anchor links on other pages by using the link tool to locate the page, then adding the anchor portion to it (e.g. /node/15206#anchor)
Back to top links
For pages using anchor links, it can be helpful to have a “Back to Top” link at the end of each anchored sub-section, to allow users to return to the original list.
- Add the words Back to Top under the anchored subsection.
- Highlight this text and click the Link button in your editing toolbar.
- Add #main-content into the Link URL field and Save. This will take the user to the top of the page, with the top navigation and main heading for the page showing.
- Alternately, if you wish to have the user jump back up to an area that isn’t quite at the top of the page, add an Anchor tag label to your first component, such as "top" and link to #top instead.
-
Uploading documents
In order to link a file or document from your web page, you must first upload the file to the website. This will make a public copy that website visitors can see.
- Save your documents to your Desktop or other folder with the following naming convention:
- lowercase-name-with-hyphens
- If these change yearly, add the year associated with them as well, so lowercase-name-with-hyphens-2016
- Log into Drupal and use your toolbars to either:
- navigate to Content > Media > Add media item > Document
- or go the Media Library page, click Add Media in the top-right, and select Document
- Click the Choose File button and select the document(s) from your computer
- Once the upload is complete, click Save
- On your web page, highlight the text you want to serve as a link and click the Link tool
- In the dialog box that appears, type the name of your uploaded file in the field labeled Link URL. Select the correct result when it appears, and click Insert
- Save your draft
Image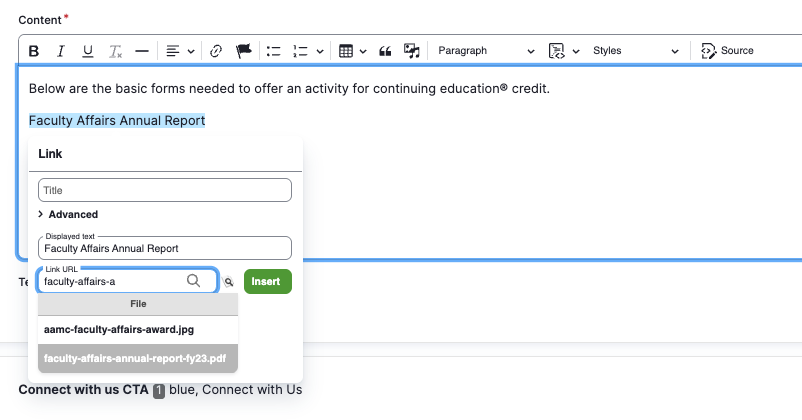
- Save your documents to your Desktop or other folder with the following naming convention: